Picture library item
Any picture (photo, screenshot...) required by the documentation project is first placed in the library. It can then be included in any number of topics while being centrally managed from the library: updating the picture in the library will automatically update all instances of that picture in any topic where it has been placed.
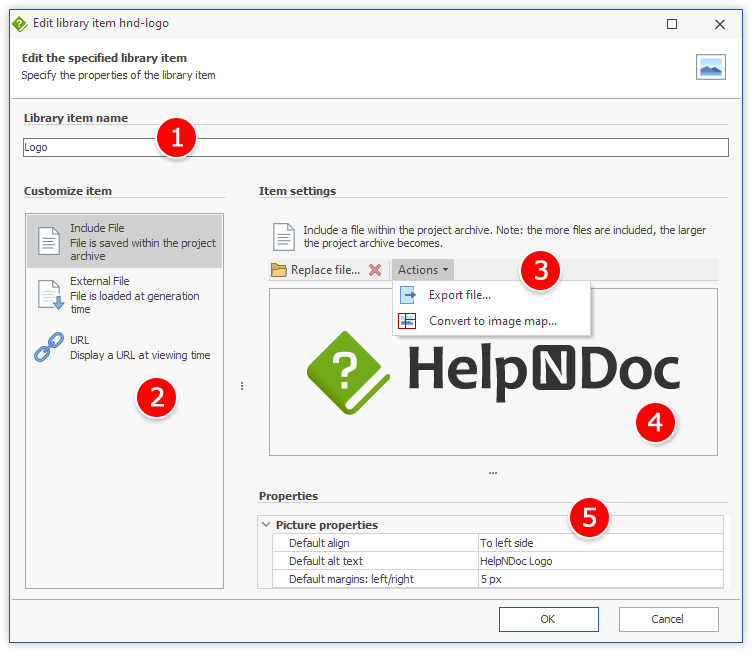
Overview of the user interface

1. Library item name
Choose a unique name for that library item.
2. Customize item
A picture can either be stored within the project or linked from an external location based on the project's requirements. Choosing how it is stored can be decided individually for each item based on pros and cons for that specific item and / or overall documentation project.
|
Storage |
Description |
Pros |
Cons |
|
Include File |
Item file is stored within the project archive |
|
|
|
External File |
Item file is stored anywhere on the hard drive or a network location, and included at generation time. Note: The external file path can be absolute, or relative to the HND project file location |
|
|
|
URL |
Item file is stored on a web server, and displayed at viewing time |
|
|
3. Commands and fields
Include File
- Insert / Replace file: Locate a file on the hard drive or a network location to
- Remove file from project: Remove the content of the file from the project
- Edit image: Open the built-in image editor to edit the image.
- Convert to image map: Convert a picture to an image map. Note: This action can take time on large projects as it needs to analyze the whole project and convert every instances of this picture. This action can't be undone.
- Export file: Export the content of the file to the hard drive
External File
- File path: Absolute or relative path of the file to include at generation time
URL
- URL: Internet link to the file to display at viewing time
4. Preview
For included files, a preview of the library item is displayed. It is possible to drag and drop a file from a third party application such as the Windows Explorer into the preview to include it or replace the existing file.
5. Properties
Custom properties for this library item. Use the "Reset" button to reset to the default value. Default properties can be applied to every instances within the project by clicking the "Apply to every instances throughout the project" button.
Note: this will override any manual settings defined in any instances.
|
Property |
Description |
|
Default align |
Specify the default alignment of the picture when added to a topic. |
|
Default alt text |
Specify the default alt text of the picture when added to a topic. |
|
Default margins |
Specify the default margins for the picture when added to a topic. |
|
Default padding |
Specify the default padding for the picture when added to a topic. |
|
Default width |
Specify the default width for the picture when added to a topic. Note: Clear this value to use the picture's default width. |
|
Default height |
Specify the default for the picture when added to a topic. Note: Clear this value to use the picture's default height. |